Tasmania’s east coast is a treasure trove of dramatic scenery, historic sites, and delicious local produce, and this 5-day guided tour offers an impressive way to see it all. While I haven’t personally experienced this trip, the glowing reviews and comprehensive itinerary suggest a well-balanced mix of natural beauty, cultural insights, and authentic Tasmanian flavors.
What really catches the eye? It’s the small-group setting, which promises more personalized attention, the stellar guides praised for their knowledge and friendliness, and the diverse range of stops—from sweeping coastal vistas to convict-era landmarks. The only consideration? The price, which may seem steep, but given the inclusions of most meals, tastings, and entry fees, many feel it’s a worthwhile investment for a curated experience.
This tour is perfect for travelers who want to get a taste of Tasmania’s highlights without the hassle of planning each stop individually. It’s especially suitable if you’re after a mix of scenic drives, cultural sites, and local food and drinks, all with a friendly guide leading the way.
- Key Points
- An In-Depth Look at the 5-Day Tasmania East Coast Tour
- Day 1: Arriving in Hobart and Settling In
- Day 2: From Hobart’s Historic Waterfront to Mount Wellington
- Day 3: Port Arthur and the Historical Depth of Tasmania
- Day 4: Coastal Wildlife and the Iconic Bay of Fires
- Day 5: Launceston and Farewell
- Overall Value and Experience
- Possible Drawbacks to Consider
- Who Will Love This Tour?
- FAQ
- Final Thoughts
- The Best Of Hobart!
- More 5-Day Experiences in Hobart
- More Tours in Hobart
- More Tour Reviews in Hobart
- Not for you? Here's more nearby things to do in Hobart we have reviewed
Key Points


- Small group size enhances personalized experience and interaction with the guide
- All-inclusive pricing covers most attractions, tastings, and some meals for convenience
- Expert guides, highly praised for their knowledge and friendliness, make the journey engaging
- Stunning scenery like Mount Wellington and Bay of Fires provides picture-perfect moments
- Authentic local experiences include wine tastings, cheese, oysters, and chocolate
- The itinerary balances activity with downtime, making it suitable for most travelers
👉 See our pick of the Our 3 Favorite Hobart Workshops & Classes
An In-Depth Look at the 5-Day Tasmania East Coast Tour
You can also read our reviews of more tours and experiences in Hobart


Day 1: Arriving in Hobart and Settling In
The adventure begins with your arrival in Hobart, where you’ll check into the stylish Movenpick Hotel. This centrally located accommodation offers a comfortable base close to the city’s best restaurants and nightlife. Most travelers appreciate the hotel’s modern, luxurious vibe—many reviews mention the perfect balance of style and comfort.
Spending your first evening at leisure means you can unwind, explore the city’s vibrant streets, or simply enjoy the hotel’s amenities. It sets a relaxed tone for the days ahead, and the hotel’s location ensures easy access to Hobart’s culinary scene.
Day 2: From Hobart’s Historic Waterfront to Mount Wellington
Your day kicks off with a stroll around Constitution Dock, a lively hub of seafood restaurants, historic statues, and the Mawson’s Hut replica museum. This spot is perfect for snapping photos of the working harbor, with Mt Wellington’s towering presence framing the scene. A highlight here, according to reviews, is the opportunity to see the famous convict vessel replica, the May Queen, and even spot a fur seal enjoying breakfast from a floating restaurant.
Next, a scenic drive through Salamanca Square and Battery Point showcases charming heritage homes and cobblestone streets. It’s a peek into Tasmania’s colonial past, and guides often share stories about the area’s significance.
The visit to Cascade Brewery offers a glimpse into Tasmania’s brewing history. Many travelers enjoy hearing stories about the brewery’s heritage and snapping photos of the impressive building architecture.
The ascent of Mount Wellington is a must, with panoramic views that sweep across Hobart and beyond. As one reviewer noted, “Sweeping, panoramic views are in every direction,” and being at 1275 meters gives a sense of Tasmania’s vast natural beauty.
Crossing the Tasman Bridge, you’re headed over to the Eastern Shore, en route to the east coast. The drive itself is scenic, setting the tone for the adventures ahead.
Lunch at Puddleduck Vineyard introduces you to Tasmania’s renowned wine scene, with a platter of gourmet local produce and free tastings. Guests often mention how the relaxed atmosphere here makes the experience memorable, with many appreciating the chance to sample some of the freshest wine and food in Hobart.
A quick stop at Richmond Bridge, Australia’s oldest still-in-use bridge, is a charming step back in time. Built in 1823 by convicts, it’s a picturesque reminder of Tasmania’s colonial roots.
Later in the afternoon, views of the Denison Canal and a visit to Pirates Bay at Eaglehawk Neck provide stunning lookout points and photo ops, with many guests remarking on the area’s rugged beauty. The Tessellated Pavement, with its cracked, patterned rocks, offers a bizarre natural spectacle that’s both fascinating and photogenic.
The day winds down with a visit to Tasman National Park, where geological formations like Tasman’s Arch and Devil’s Kitchen are highlights. Many travelers comment on how these formations, carved over millions of years, are both awe-inspiring and educational.
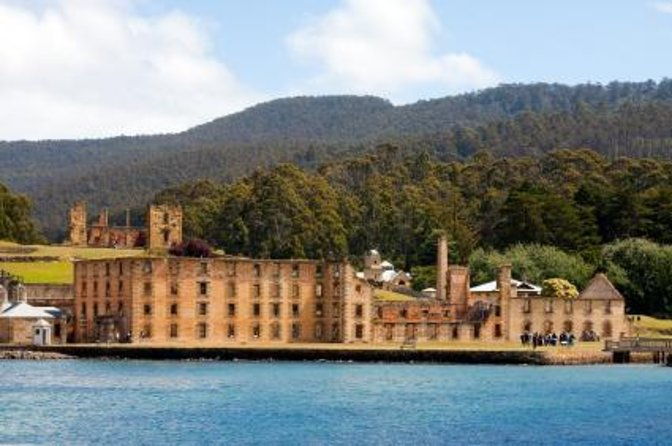
Day 3: Port Arthur and the Historical Depth of Tasmania
The visit to Port Arthur Historic Site is a cornerstone of the trip. A guided 3-hour tour reveals the stories behind Tasmania’s convict past, with scenic vantage points and well-preserved buildings. Many reviews highlight the quality of guides—“Morgan Wilson was fantastic,” says one reviewer—who bring history alive with engaging stories.
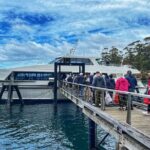
A 30-minute harbor cruise offers a different perspective, allowing visitors to see the site from the water and imagine what it was like for convicts arriving or departing.
Federation Artisan Chocolates provides a delicious break, with handmade chocolates and tasting samples that many guests rave about. Next, the Port Arthur Lavender Farm offers a splash of color and fragrance, with lavender products and farm views.
Passing Maria Island, guests catch a glimpse of its convict settlements and thriving Devil populations—a good note for wildlife lovers.
The quirky Spiky Bridge built by convicts in the 1840s is an unusual sight, sparking curiosity and photo opportunities. Afternoon tea at Spiky Beach with a view of Coles Bay offers a relaxing pause.
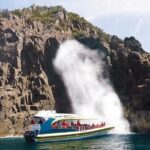
The day concludes with a guided walk to Bicheno Blowhole, where guests often enjoy watching the sea spout water 25+ feet into the air—one reviewer described it as “a spectacular coast feature during the daylight.”
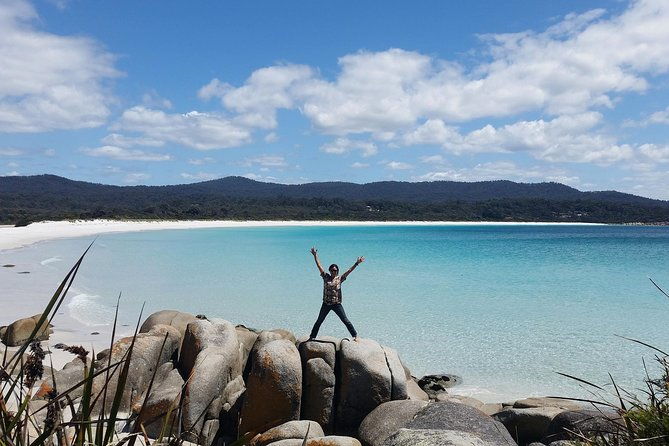
Day 4: Coastal Wildlife and the Iconic Bay of Fires
Starting the day at the Bicheno Blowhole again provides a fresh perspective, with the natural phenomenon often spurting water into the sky. Many guests find that visiting in daylight offers better photo opportunities and a clearer view of the coast’s rugged beauty.
A morning at East Coast Natureworld is a highlight, especially for animal lovers. Rescued native animals, including Tasmanian Devils, are the stars here. One reviewer mentions witnessing hand-feeding of Devils, which adds a personal touch to wildlife encounters.
In the afternoon, Bay of Fires greets visitors with bay-white sands, glowing orange rocks, and crystal-clear water. Guests love wandering along the beach, dipping their toes in the water, or snapping pictures of the dramatic coastline.
A quick stop for fresh oysters at Lease 65 Oyster Farm in St Helens is a treat—many reviews describe the oysters as “the freshest you’ll ever taste.” Then, Pyengana Dairy impresses with its award-winning cheese and a fully automated robotic dairy, which fascinates many visitors.
The day wraps up at the Legerwood Memorial Tree Carvings, a unique outdoor war memorial carved into trees, which guests find both touching and artistic.


Day 5: Launceston and Farewell
The final morning offers free time in Launceston, with guests free to explore the city’s parks, mall, or just relax at the hotel. Many reviewers mention how peaceful and charming Launceston feels after a busy few days of sightseeing.
Overall Value and Experience
This tour’s price of $1,451.52 per person covers most attractions, meals, and tastings, which many guests agree makes it a good value. The inclusion of most meals and entry fees simplifies planning and ensures you won’t need to worry about extra costs. Reviews consistently praise the knowledgeable guides—notably Morgan, Carl, and Dean—for making the trip engaging and informative.
Transportation on a small group bus means comfort and intimacy, with most travelers mentioning how easy it was to connect with their guides and fellow travelers. The small group size, capped at 15, allows for more flexibility and personalized attention, which many reviewers appreciate.
The tour strikes a balance between structured sightseeing and downtime, making it suitable for a range of travelers—from history buffs to nature lovers and foodies. The itinerary is thoughtfully curated, covering geological wonders, historical sites, and scenic coastlines, with ample opportunities for stunning photos and local tastings.
Possible Drawbacks to Consider
While the tour is packed with highlights, some reviews mention misleading admission details on certain stops (e.g., Cataract Gorge, Richmond Bridge), where entry was free but labeled as “admission included”—a minor quibble that doesn’t detract from the overall experience but is worth noting.
Plus, the price point may be a barrier for some, but given what’s included, many find it offers good value for a comprehensive Tasmanian experience.
Who Will Love This Tour?
If you prefer guided travel with knowledgeable guides, this tour is a fantastic choice. It suits those who want to see Tasmania’s main sights without the stress of planning, and are happy to share the experience with a small group. Food and wine lovers, wildlife enthusiasts, and history buffs will all find plenty to enjoy. Be prepared for some walking and scenic drives—this isn’t a luxury lounge tour, but rather a well-rounded adventure through Tasmania’s highlights.
FAQ
Is pickup offered for this tour?
Yes, pickup is available, making it easy to start your adventure without logistical worries.
How many people are in each group?
The tour caps at 15 travelers, ensuring a more personal experience and better interaction with guides.
Are most meals included?
Yes, most meals are included, along with tastings of wine, cheese, oysters, and chocolate, which many guests find adds great value.
What attractions require admission fees?
Most included stops have fees covered, such as Mount Wellington, Port Arthur, and Tasman’s Arch. However, some locations like Cataract Gorge and Richmond Bridge are free, despite being labeled as “admission included” in some descriptions.
Can I extend my stay after the tour?
Yes, additional nights in Launceston or other arrangements can be made upon request, giving flexibility to explore more.
Is this tour suitable for all ages?
Most travelers can participate, but check with the provider if you have specific concerns about walking or accessibility.
Final Thoughts
This 5-day East Coast Tasmania tour is a thoughtfully curated, well-reviewed experience that appeals to curious travelers eager to see Tasmania’s highlights comfortably and confidently. The combination of stunning scenery, local tastings, and engaging guides makes it an excellent choice for those who appreciate a balanced mix of education and leisure.
While the cost may seem high for some, the inclusions and small-group setting add value, especially for travelers who want an experience tailored to their interests. If you’re after a comprehensive, hassle-free way to explore Tasmania’s scenic coastlines, historic sites, and gourmet delights, this tour is likely to leave you with plenty of memorable moments.
In essence, this tour offers a friendly, informative, and scenic introduction to Tasmania’s best bits, making it ideal for first-time visitors or those who prefer a guided approach.