This Hobart tour offers an engaging blend of historical sights, scenic views, and contemporary art, making it a fantastic way to get a well-rounded introduction to Tasmania’s vibrant capital. While we haven’t personally taken this exact trip, the detailed reviews and itinerary paint a picture of a thoughtfully curated day that balances sightseeing, relaxation, and cultural discovery.
Three things we particularly love about this experience are the variety of stops, which include both scenic viewpoints and historic sites; the river cruise that adds a peaceful, scenic element; and the fascinating MONA museum, showcasing a diverse collection from antiquities to cutting-edge contemporary art. One possible consideration? The tour’s pace means quite a lot is packed into one day—so if you’re prone to feeling rushed or prefer a more leisurely experience, some stops might feel brief.
This tour suits travelers who enjoy a mix of history, stunning scenery, and modern art — perfect for first-timers or those wanting a snapshot of Hobart’s best features in one day.
This experience made our article of Hobart’s 12 Top City Tours.
- Key Points
- An In-Depth Look at the Hobart Experience
- Starting Point and Overall Logistics
- Itinerary Breakdown
- The Scenic Cruise
- Additional Stops and Highlights
- The Value of the Tour
- Practical Tips and Considerations
- Reviewer’s Perspective
- Final Thoughts: Is This Tour for You?
- FAQs
- The Best Of Hobart!
- More City Tours in Hobart
- More Tours in Hobart
- More Tour Reviews in Hobart
- Not for you? Here's more nearby things to do in Hobart we have reviewed
Key Points

- Diverse Itinerary: Combines city sights, scenic viewpoints, historical sites, and MONA.
- Expert Guide: Guides like Tim are praised for their knowledge and enthusiasm.
- Scenic River Cruise: Adds a relaxing dimension and great photo opportunities.
- Balanced Duration: Around 8 hours, with plenty of time at each major stop.
- Good Value: Includes transportation, guide commentary, and MONA entry for around $92.
- Flexible for Most Travelers: Suitable for a wide age range and mobility levels, though visitors should be aware of some steps at MONA.

👉 See our pick of the Our 3 Favorite Hobart Workshops & Classes
An In-Depth Look at the Hobart Experience
You can also read our reviews of more city tours in Hobart


Starting Point and Overall Logistics
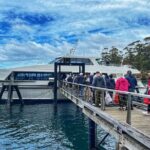
Kicking off at the Mona Brooke Ferry Terminal at 9:30 am, this tour positions you centrally, making it easy to access. The group size maxing out at 100 travelers ensures a lively, yet manageable atmosphere. The tour uses an air-conditioned vehicle, which is a welcome feature, especially on warmer days, and the live commentary promises an engaging narrative from your guide.
Booking well in advance (average 43 days) suggests travelers are eager to secure this popular experience, especially considering the full-day duration of about 8 hours. The inclusion of a mobile ticket makes it straightforward to plan and join your tour without fuss.
Itinerary Breakdown
Stop 1: Cascade Gardens
This early stop provides a scenic introduction to Hobart. It’s a quick 20-minute visit, but what stands out is the opportunity for photos of the historic Cascade Brewery and a walk through the lush Botanical Gardens. Reviewers mention that even in rainy weather, this stop was enjoyable, offering a peaceful start to the day.
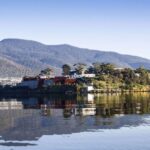
Stop 2: Rosny Hill Lookout
A short 15-minute stop for panoramic views of Hobart and the Derwent River. This viewpoint is perfect for snapping photos and getting a feel for the geography of the city. It’s a classic photo spot that many visitors find memorable.
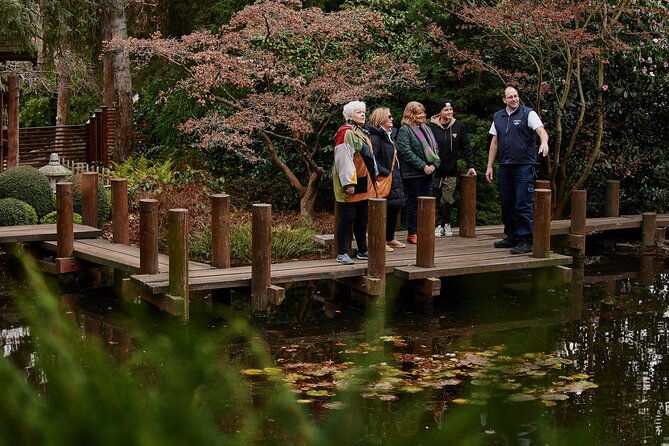
Stop 3: Royal Tasmanian Botanical Gardens
Spending about 50 minutes wandering through this beautifully maintained garden, visitors can appreciate the diverse plant collection and tranquil atmosphere. Reviewers have praised the gardens as a highlight, with one noting it as “really enjoyed” and a “beautiful” stop. It’s a good chance to stretch your legs and soak in some nature.
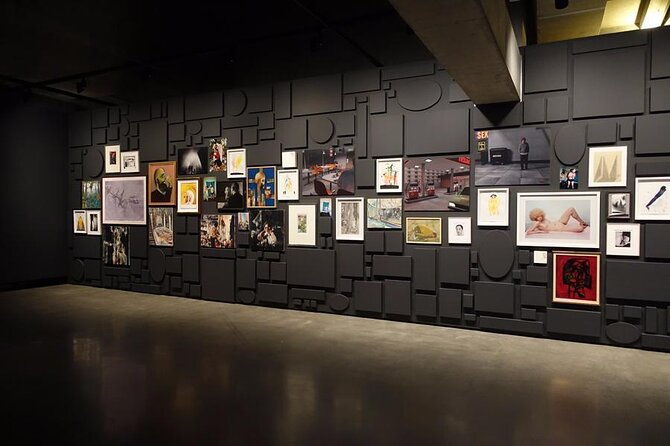
Stop 4: MONA (Museum of Old and New Art)
This is the tour’s crown jewel. Located within the Moorilla winery, MONA is renowned for its eclectic collection — over 400 works encompassing antiquities, modern, and contemporary art. The museum’s architecture itself is an impressive sight, and the collection offers something for almost every taste.
Expect a 4-hour immersion, with reviews confirming that the visit is well worth it, even for those not typically into modern art. The museum’s diversity means you’ll find ancient relics alongside provocative contemporary installations, which can be a surprise depending on your art preferences. As one reviewer put it, the area is “very much worth a visit,” including the ferry ride, which adds a scenic and relaxed element to the day.
The Scenic Cruise
The Derwent River cruise is a key part of the experience. It’s not just about transport but adds a serene, scenic perspective of Hobart’s waterfront and surrounding landscapes. Many reviews highlighted the ferry ride as very comfortable and a nice way to transition from land sightseeing to the artistic exploration of MONA. It offers a different vantage point, perfect for memorable photos and a taste of Hobart’s maritime character.
Additional Stops and Highlights
While the main stops are well-covered, some reviews mention visits up to Mount Wellington or the Old Female Convict Prison remains, adding historical depth to the morning. The driver and guide, often praised for their friendliness and knowledge, help make these stops engaging and informative.


The Value of the Tour
Priced at $92.06 per person, including transportation, guide commentary, and MONA admission, this tour provides solid value — especially considering the comprehensive itinerary. The inclusion of MONA is a significant perk, as individual entry tickets to the museum can be expensive, and having it bundled saves both time and money.
Practical Tips and Considerations
- Walking and steps: Reviewers noted that some parts of MONA involve stairs, which could be challenging for those with mobility issues. Mona is working on a new platform to address this, but it’s worth being aware.
- Weather: Most stops are outdoors or semi-outdoor, so dressing appropriately for the day’s weather is smart. The tour is weather-dependent, and poor conditions could lead to cancellations or delays.
- Time management: The itinerary is well-structured, but with so many stops packed into a day, expect a fair amount of bus travel and brief stops. If you prefer a slow pace or more time at each location, you might want a more specialized tour.
Reviewer’s Perspective
Many guests appreciated the knowledge and friendliness of guides like Tim and Evan, who added personality and insight to the day. The combination of scenic viewpoints, historic sites, and the art museum creates a well-rounded snapshot of Hobart.
Some found MONA to be “overrated” or not to their taste, especially if modern art isn’t their thing. However, the architecture and the surrounding area are often praised, with some suggesting it’s worth the visit regardless. The guides’ commentary about Hobart’s history and highlights was frequently highlighted as a tour strength, making the city come alive for visitors.
Final Thoughts: Is This Tour for You?
If you’re after a one-day introduction to Hobart that covers major sights, offers a scenic cruise, and includes a visit to one of Australia’s most talked-about museums, this tour hits the mark. It’s especially good for first-timers or those who want to combine sightseeing with cultural exploration without the hassle of planning multiple entries or transport.
Travelers who enjoy guided commentary, appreciate scenic views, and are open to contemporary art will find this experience engaging and valuable. It’s also a practical choice if you’re looking for a full-day, hassle-free package that maximizes your time and money.
However, if modern art isn’t your thing or you prefer a more leisurely pace, you might find some stops too brief or the overall schedule a bit packed.
FAQs
Is the tour suitable for all ages?
Yes, most travelers can participate, and the tour is suitable for a wide age range. However, be aware of steps at MONA if mobility is an issue.
What is the meeting point and start time?
The tour begins at the Mona Brooke Ferry Terminal at 9:30 am and ends back at the same location.
Does the tour include food and drinks?
No, food and drinks are not included unless specified. You may want to bring snacks or plan for lunch during free time.
How long is the MONA visit?
You’ll have around 4 hours to explore the museum, which is plenty of time to see the highlights and enjoy various installations.
What’s the transportation like?
The tour uses an air-conditioned vehicle, ensuring comfort during the sightseeing segments, along with a scenic ferry ride.
Can I cancel if plans change?
Yes, full refunds are available if you cancel at least 24 hours in advance. Less than 24 hours’ notice means no refund.
This Hobart tour strikes a balance between scenic beauty, history, and modern art, making it an excellent choice for those wanting a comprehensive day out. Its mix of guided commentary, scenic views, and the iconic MONA museum delivers a memorable taste of Tasmania’s capital, especially for first-timers eager to see the best in one go.
📍 This experience made our list of the 12 best City Tours in Hobart